|
|
The purpose of simulation is to allow you to see and navigate the program as if you were playing it back from a set-top DVD player. This allows you to thoroughly test the project from the end-user’s point of view.
Because simulation is integrated directly into ReelDVD, any problems you uncover during simulation can be corrected as soon as they are found (unless they result from improper asset preparation). In fact, simulation is normally used continually throughout the authoring process to spot-check the effect of authoring decisions as they are made.
This sections includes the following topics:
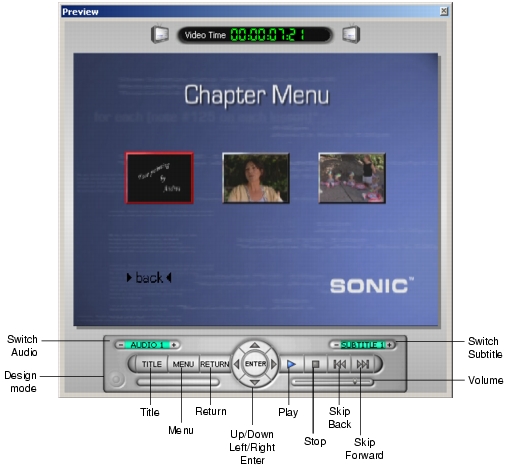
Simulation in ReelDVD takes place in the Preview window, which has two modes: Design and Simulation. To switch between modes, click the “LED” at the bottom left of the Preview window. In Simulation mode, the LED is green, and the panel contains the same keys found on a DVD-Video remote control. See Design Mode for a complete explanation of Simulation mode controls.
For a thorough simulation of the project, do the following:
In the Storyboard area, select the first Track in the project (indicated by the yellow arrow from the Auto Play icon). Then switch the Preview window to Simulation mode and click Play on the on-screen remote control. The project will begin playing through the Tracks. In the Storyboard area, a silver “reel” icon will appear at the lower right of the Track icon for the currently playing Track. When playback reaches a menu, click Skip Forward on the Preview window’s on-screen remote control to continue the simulation. If a Track appears out of the desired order, check the Next Track link of the preceding Track.
For each Track in the project, confirm that playback responds as intended when you click the keys on the on-screen remote control. See DVD Remote Keys for a list of the keys to check and their functions.
For each menu, confirm that the subpictures are correctly positioned with respect to the background image. Also check that the desired colors and contrast levels are set for the Display, Selection and Action button states.
For each button on each menu, confirm that the position of the hotspot corresponds with the background and subpicture graphics that indicate the presence of the button to the viewer.
For each menu, confirm that each button takes project playback to the desired Track or chapter in a Track.
DVD-Video players have the capability to automatically play back the appropriate audio and subpicture streams of a Track based on the language code assigned to the streams and the language preference settings in the player’s setup menu.
A DVD player checks the language preference setting for audio when it starts playing a disc. If an audio stream exists in the DVD title that matches this setting, it will be selected for playback. If not, audio stream #1 (Au 1) will be used by default.
Likewise, the DVD player will attempt to select a subpicture stream based on the player setup. If there is no subpicture stream on the disc with a matching language, then subpicture stream #1 (Sp 1) will be used by default.
You can test the automatic selection of audio and subpicture streams in your project as follows:
|
Sonic Solutions/ Voice: 415.893.8000 Fax: 415.893.8008 info@sonic.com |